一、WSGI是什么?
WSGI,全称 Web Server Gateway Interface,或者 Python Web Server Gateway Interface ,是为 Python 语言定义的 Web 服务器和 Web 应用程序或框架之间的一种简单而通用的接口。描述的是Web服务器如何与Web应用间进行通信
它不是服务器、python模块、框架、API或者任何软件,只是一种描述web服务器(如nginx,uWSGI等服务器)如何与web应用程序(如用Django、Flask框架写的程序)通信的规范。
WSGI 的官方定义是,the Python Web Server Gateway Interface。从名字就可以看出来,这东西是一个Gateway,也就是网关。网关的作用就是在协议之间进行转换。

二、uWSGI是什么?
uWSGI是一个Web服务器,它实现了WSGI协议、uwsgi、http等协议。它要做的就是把HTTP协议转化成语言支持的网络协议。比如把HTTP协议转化成WSGI协议,让Python可以直接使用。Nginx中HttpUwsgiModule的作用是与uWSGI服务器进行交换。
要注意 WSGI / uwsgi / uWSGI 这三个概念的区分。
- WSGI,是一种描述web服务器(如nginx,uWSGI等服务器)如何与web应用程序(如用Django、Flask框架写的程序)通信协议。
- uwsgi协议是一个uWSGI服务器自有的协议,它用于定义传输信息的类型(type of information),每一个uwsgi packet前4byte为传输信息类型描述,用于与nginx等代理服务器通信,它与WSGI相比是两样东西。
- uWSGI是实现了uwsgi和WSGI两种协议的Web服务器。
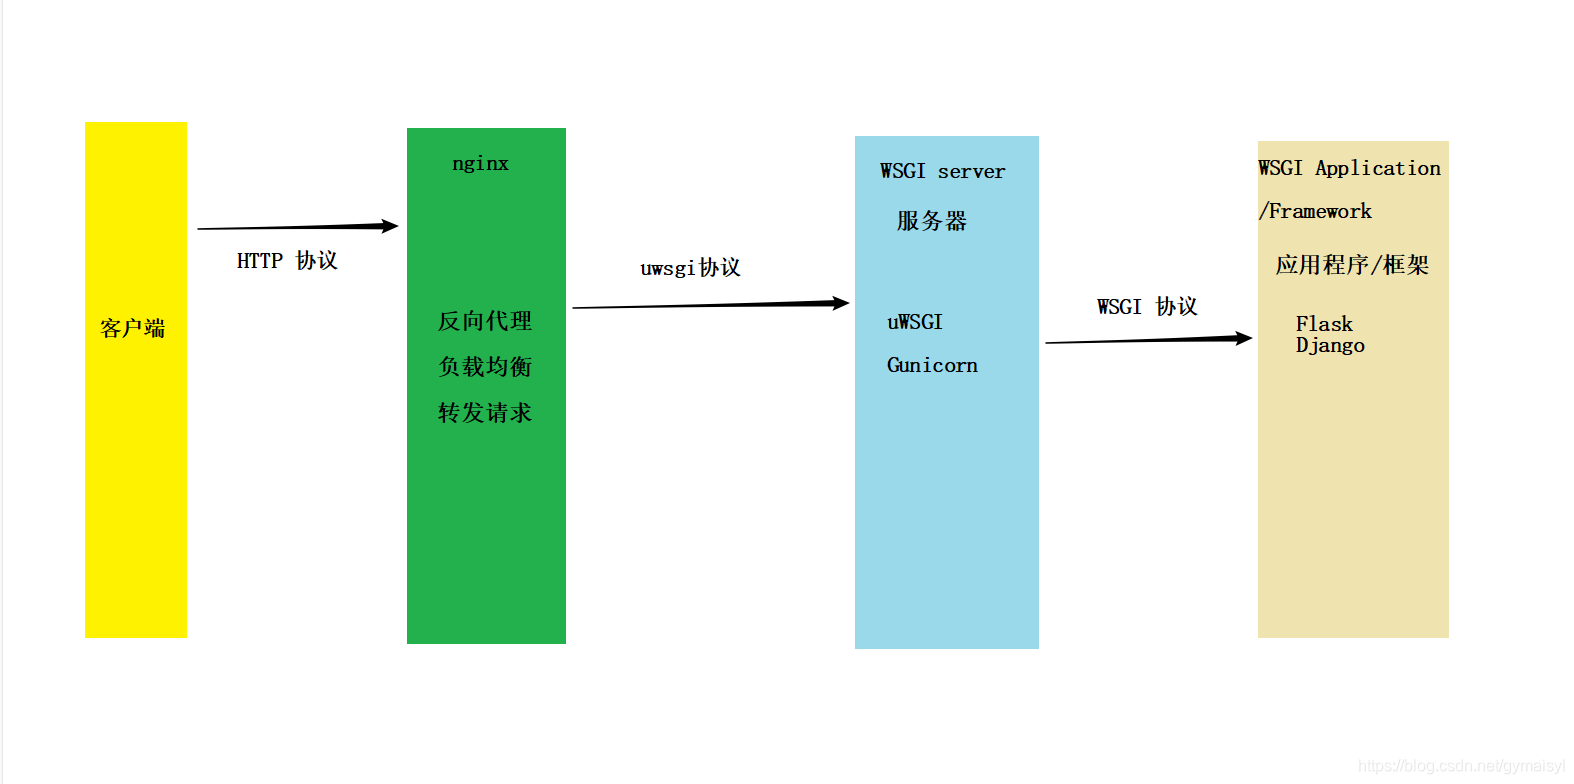
为什么有了uWSGI为什么还需要nginx?因为nginx具备优秀的静态内容处理能力,然后将动态内容转发给uWSGI服务器,这样可以达到很好的客户端响应。
#FastCgi协议, uwsgi协议, http协议有什么用?
nginx 和 uWSGI交互就必须使用同一个协议,而上面说了uwsgi支持fastcgi,uwsgi,http协议,这些都是nginx支持的协议,只要大家沟通好使用哪个协议,就可以正常运行了。
uwsgi是服务器和服务端应用程序的通信协议,规定了怎么把请求转发给应用程序和返回
Django,Flask项目部署
windows开发环境下打包本地依赖版本打到requirements.txt文件中
1 | pip freeze > requirements.txt |
Linux环境下,进入虚拟环境中,然后进入到项目所在目录,安装好相应的包
1 | pip install -r requirements.txt |
django 服务器
- runserver
- wsgi
uwsgi : web服务器,多线程处理的不错
pip install uwsgi工程目录下创建
uwsgi.ini配置文件1
2
3
4
5
6
7
8
9
10
11
12
13
14
15
16
17
18
19
20
21
22
23
24
25
26
27
28
29
30[uwsgi]
# 使用nginx连接时 使用
socket = 0.0.0.0:8080
# 直接作为web服务器使用
#http=0.0.0.0:8080
# 配置工程目录
chdir = /usr/local/Python_RomoteWorkspace/flaskblog
# 配置项目的wsgi目录。相对于工程目录
# wsgi-file=OnlineStore/wsgi.py
# 适用于flask项目部署
wsgi-file = app.py
# router
callable = app
#配置进程,线程信息
processes = 4
threads = 10
enable-threads = True
master = True
pidfile = uwsgi.pid
daemonize = uwsgi.log书写配置信息
使用uwsgi服务器
- 启动:
uwsgi --ini uwsgi.ini - 停止:
uwsgi --stop uwsgi.pid
- 启动:
结合
nginx反向代理1
2
3
4
5
6
7
8
9
10
11
12
13
14
15
16
17
18# 查看进程
ps -ef |grep nginx
# 控制Nginx
nginx -s signal
stop 快速关闭
quit 优雅的关闭
reload 重新加载配置
# 通过系统管理
systemctl status nginx 查看nginx状态
systemctl start nginx 启动nginx服务
systemctl stop nginx 关闭nginx服务
systemctl enable nginx 设置开机自启
systemctl disable nginx 禁止开机自启
nginx -t # 不运行,仅测试配置文件
nginx -c configpath # 从指定路径加载配置文件
nginx -t -c configpath # 测试指定配置文件
nginx.conf主要配置
1 | location /static{ # nginx动静分离配置 |
完整配置
1 | user root; |
问题
安装uwsgi 报错:plugins/python/uwsgi_python.h:2:20: 致命错误:Python.h:没有那个文件或目录

解决:
需要安装gcc 和python-dev
1 | yum -y install gcc |